Lチカアルティメット-5 RaspberryPiのGPIOを操作して連携させる
2021-03-19
GPIOの制御、というか読み書き
RaspberryPiのGPIOに関する記事をみると、
RPi.GPIO
に関するものが多く。
確かに手軽ではあるのですが、何やってるかよくわからない。
っていうか、、なんとなく使い方が美しくないので、
こんな記事を読んでみましょう。
もちろん、これでGPIOの仕組みがわかるわけではありませんがぁ、
これを読めば、なんとなくクラスのひとつも作れるってもんです。
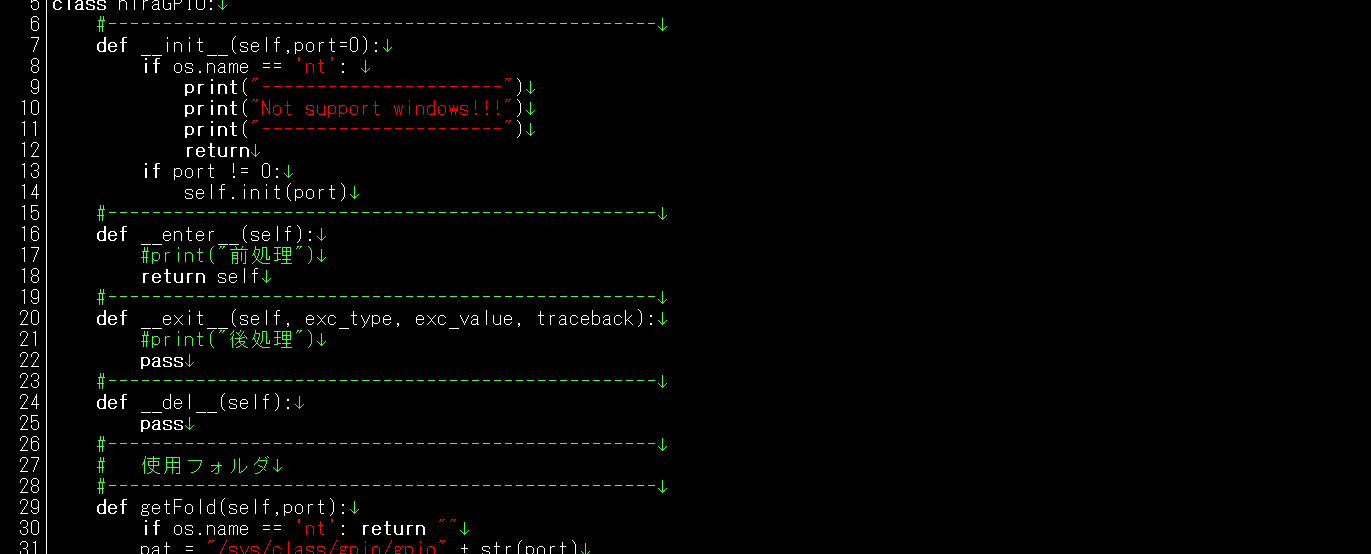
なんとなくちゃちゃっとPythonクラスをつくってみた
import subprocess
import os


class hiraGPIO:
	#--------------------------------------------------
	def __init__(self,port=0):
		if os.name == 'nt':
			print("----------------------")
			print("Not support windows!!!")
			print("----------------------")
			return
		if port != 0:
			self.init(port)
	#--------------------------------------------------
	def __enter__(self):
		#print("前処理")
		return self
	#--------------------------------------------------
	def __exit__(self, exc_type, exc_value, traceback):
		#print("後処理")
		pass
	#--------------------------------------------------
	def __del__(self):
		pass
	#--------------------------------------------------
	#	使用フォルダ
	#--------------------------------------------------
	def getFold(self,port):
		if os.name == 'nt':	return ""
		pat	= "/sys/class/gpio/gpio" + str(port)
		return	pat
	#--------------------------------------------------
	#	存在確認
	#--------------------------------------------------
	def exist(self,port):
		if os.name == 'nt':	return False
		pat	= self.getFold(port)
		if os.path.exists(pat):
			return	True
		return	False
	#--------------------------------------------------
	#	初期化(初期化されていなければ)
	#--------------------------------------------------
	def init(self,port):
		if self.exist(port):
			pass	#print("already setting!")
		else:
			comstr	= "echo " + str(port) + " > /sys/class/gpio/export"
			result	= subprocess.run(comstr,	shell=True)
	#--------------------------------------------------
	#	inかoutかを設定
	#--------------------------------------------------
	def setmode(self,port,mode):
		if os.name == 'nt':	return False
		self.init(port)
		pat	= self.getFold(port)
		v = "out"
		if mode == "in":
			v = "in"
		comstr	= "echo " + v + " > " + pat + "/direction"
		result	= subprocess.run(comstr,	shell=True)
	#--------------------------------------------------
	#	inかoutかを取得
	#--------------------------------------------------
	def getmode(self,port):
		if os.name == 'nt':	return ""
		self.init(port)
		pat	= self.getFold(port)
		comstr	= "cat " + pat + "/direction"
		result	= subprocess.check_output(comstr,	shell=True)
		if result[0:3] == b"out":
			return	"out"
		if result[0:2] == b"in":
			return	"in"
		return	""
	#--------------------------------------------------
	#	値を設定(0か1)
	#--------------------------------------------------
	def setValue(self,port,n):
		if os.name == 'nt':	return
		self.init(port)
		pat	= self.getFold(port)
		v = "0"
		if n == 1:
			v = "1"
		comstr	= "echo " + v + " > /sys/class/gpio/gpio" + str(port) + "/value"
		result	= subprocess.run(comstr,	shell=True)
	#--------------------------------------------------
	#	値を取得(0か1)
	#--------------------------------------------------
	def getValue(self,port):
		if os.name == 'nt':	return False
		self.init(port)
		pat	= self.getFold(port)
		comstr	= "cat " + pat + "/value"
		result	= subprocess.check_output(comstr,	shell=True)
		return	(result[0] == 49)	# '1 '-> 49
	#--------------------------------------------------
	#	解放?
	#--------------------------------------------------
	def close(self,port):
		if os.name == 'nt':	return
		comstr	= "echo " + str(port) + " > /sys/class/gpio/unexport"
	#--------------------------------------------------
#--------------------------------------------------
if __name__ == '__main__':
	P = hiraGPIO(21)
	a = P.getmode(4)
	a = P.getmode(23)
	print("mode is ",a)
もちろん、こんな
if os.name == ‘nt’: ~~~
なんていうものは、いらないわけですが、、
ボーっとしながら、あれもこれも、仕事も趣味も、WindowsもLinuxも、、
そして、RaspberryPiって言ったって、アクセスはWidows10からしてるわけで、
コーディングしてると、
知らないうちにGPIOのPythonプログラムをWindows10で動かそうとしていた
なんてこともあるわけなので、、つけてあるだけです。
実際の使い方は、
P = hiraGPIO(21)
P.setmode(21,"out")
P.setValue(21,1) #光る
P.setValue(21,0) #消える
こんな感じで。
実際に制御できるかどうかのテスト
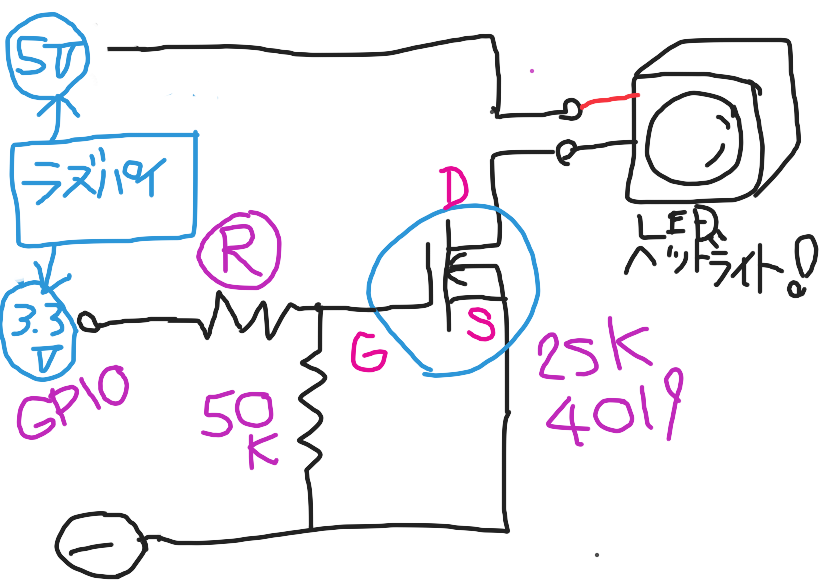
前回の回路をつかってみます。
【GPIO 】 という表示のところは、GPIOの21番(40番ピン)を使用してみます。
GNDが39番ピンにあるので、端の2つのピンですね。
あとは、Pythonで、こんな感じですね。
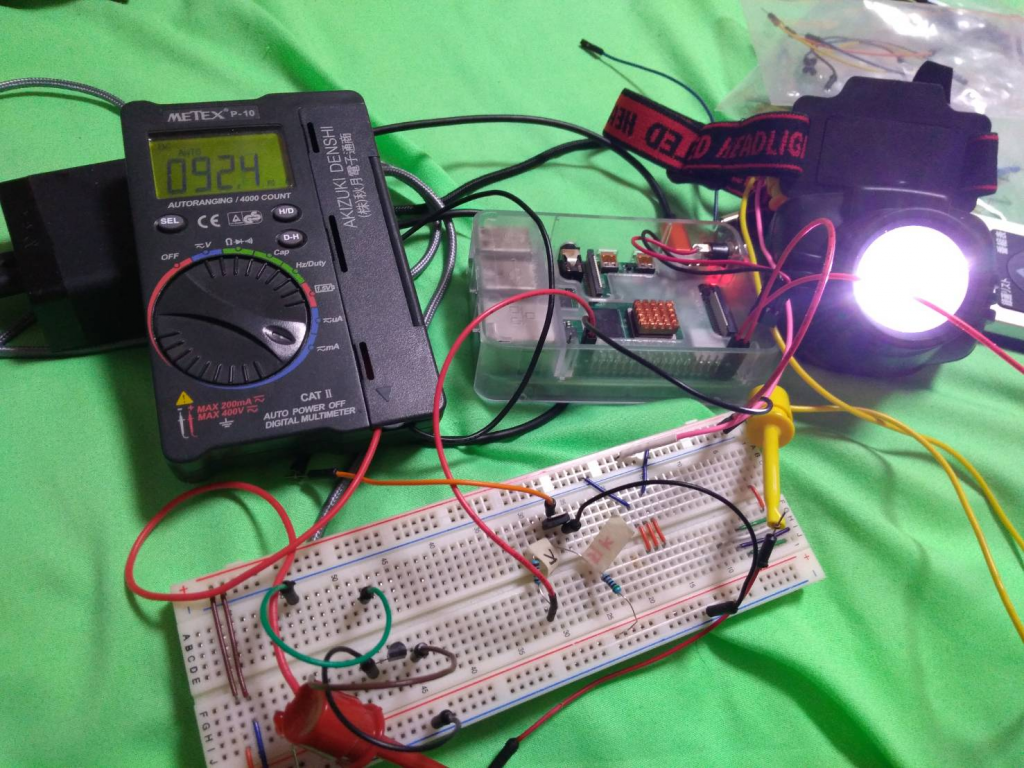
で、実物はこんな感じで。
#Lチカ
#Lチカアルティメット
#電子工作
#RaspberryPi
#Arduino
#2SK4017

- hiraide
- WebSocketを今一度整理その2 2025-03-24
- WebSocketを今一度整理その1 2025-03-24
- Pythonでマルチスレッドのちょっと複雑なやつを書く準備。 2025-03-22
- GoogleCloudをマスターしましょう 2025-02-11
- WORDPRESDSのELEMENTORの【古い翻訳を削除できませんでした。】の件 2023-08-31